6.7L Power Stroke Replacing Clogged EGR Cooler Core

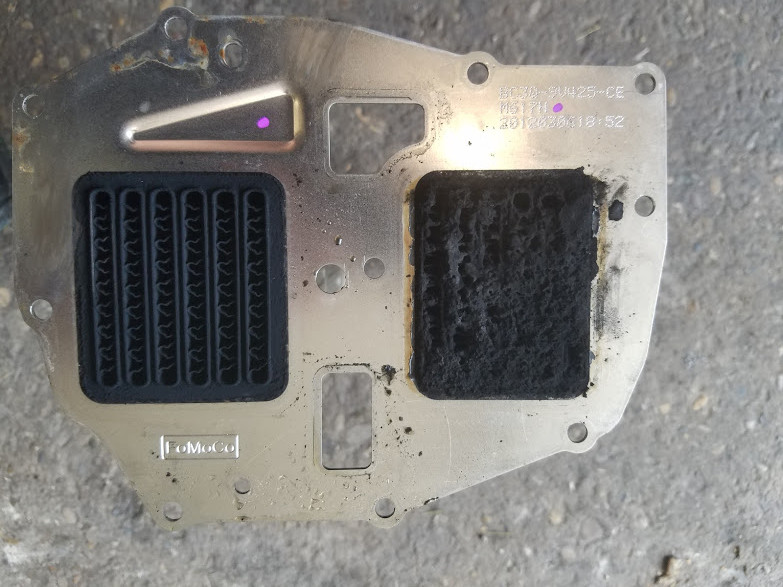
There are several reasons you might need to change the EGR cooler, but the #1 cause of the P0401 diagnostic trouble code on a 6.7L Power Stroke engine is a clogged EGR cooler. The replacement of the EGR cooler core is called upon in a technical service bulletin released by Ford. This is a guide on changing the internal EGR Cooler core on the 6.7L Power Stroke engine to get the check engine light (CEL) off of your dash.
Ford Power Stroke History of EGR Failures and Corrections
Ford made steps to solve some common problems of the past with this engine. Past Powerstroke engines of the International variety would constantly deposit so much carbon on the EGR valve causing it to stick open or shut, sometimes making removing the valve impossible. This happens because the exhaust gas first gets cooled through the cooler and is allowed to dead end on the colder EGR valve. Ford's fix was to move the EGR valve to the hot side of the system which cured most EGR valve issues. The exhaust gases enter the valve first then pass through the coolers before entering the intake system, but now carbon deposits inside the cooler itself.
The topic of installing EGR delete kits has been discussed endlessly. It is illegal to eliminate or circumvent emissions controlling components installed by the factory on your vehicle, thus only for off-road or racing use. Eliminating it will require the use of a tuner to fool the truck into thinking it is still attached and working properly. Keep in mind that EGR functionality keeps these engines quiet. A good read: Are EGR deletes worth it?.
The EGR system is very important to the correct functionality of the SCR system. The exhaust gas recirculation allows to reduce combustion temperatures to reduce NOx creation. The SCR system was developed exclusively to deal with excessive NOx creation.
6.7 Power Stroke Checking for EGR Cooler Flow and Cooler Efficency
Flow through the EGR Cooler can easily be checked with an appropriate scan tool. By monitoring key pids you can determine the effectiveness of the cooler. Monitor MAF, EGR Temp, Bypass valve command, and EGR valve command. Set engine RPM to 1200, command the EGR closed and the bypass off. Slowly open the EGR with the scan tool and watch as MAF decreases significantly and proportionally if the cooler is flowing well. The EGR temp will rise so command the bypass valve on. The EGR temp should drop drastically in about 5 seconds if working properly.
I'll describe to you the way I go about replacing it that also will save you time over the regular standard labor time. Be sure to perform this work in a well lit, clean environment with an ample space set aside for disassembling the cooler after removal. Make sure you have all the tools specifically mentioned in my guide or a comparable equivalent along with drain pans for the coolant. Round up all the parts you will need to complete this task.
EGR Cooler Core - BC3Z-9V425-A
Gasket Kit - BC3Z-9P455-A
Motorcraft Orange / Motorcraft Yellow Coolant
Cheaper Alternative available:
Dorman 904-405: 6.7 PSD EGR Kit
It should be noted that this EGR cooler removal and replacement process is written with the older first generation of 6.7L in mind, but it applies very similarly to the second generation. Only a few changes need to be recognized.
6.7L Power Stroke EGR Cooler Assembly Removal from Engine
-
Begin by draining the primary and secondary cooling systems. The radiators have petcocks (one on drives side, one on passenger side respectively) to allow draining. Even though the coolant used is the same on each system, be sure not to cross contaminate if reusing drained coolant for refilling.
-
Now starts the way I do it.. Disconnect the PCM, unbolt the bracket and remove, unbolt the PCM and remove. The harness is attached to the bracket by push pins
-
Remove the hoses from the EGR cooler. There is 2 large hoses on top, one smaller hose on top, one smaller hose in the front. Just squeeze the clamp and position it higher on the hose.
-
Remove the coolant hose from the T coming from the intake. Becareful, the plastic T is fragile. Then remove the T from the coolant pipe by squeezing quick connect clips.
-
Position all hoses aside.
-
Remove the plastic intake tube and filter cover.
-
Unbolt all 4 bolts to the front exhaust crossover pipe and let it hang out of the way with the temp sensor remained plugged in.
-
Unbolt and remove the exhaust manifold to cooler exhaust pipe. The bolts that attach it to the exhaust manifold are notorious for breaking lately as these engines age. Attempt removal. These bolts tend to start to turn easily, after one or two complete turns the get really hard to turn. The issue seems to be rust/debris building up on the bottom of the threads that stick out past the drilled holes. Work the bolts back and forth with lubricant until they are free. If one bolt does not break away easily, try the other bolt because even if only one is removed and the other only turns slightly but allows the pipe some movement, leave it and continue to follow remaining steps for removal of the EGR cooler and try to swing the exhaust pipe out of your way. If both bolts will not twist easily, prepare to break them and drill and tap the holes OR remove the battery tray to finagle the cooler out without removing these bolts.
-
Gen 1 Reach to the back of the EGR cooler and unplug the exhaust back pressure sensor, remove the harness attachment from the stud in the top right corner. Using a short 10mm ratcheting wrench, loosen the EBP sensor bracket nut approximately 5 full turns but make sure only the nut is loosening and not the stud. If the stud is also turning, use a 13mm wrench to hold it. Attached picture shows the EBP tube bracket.(Picture). Gen 2 The ebp sensor bracket can be removed easily from the top.
-
Gen 1 Push and pull up on the EBP sensor bracket to get it off the stud. It is slotted.
-
Remove the two push pins holding the passenger side injector insulator to the EGR cooler housing.
-
Remove the two 10mm bolts attaching the main engine harness to the front of the EGR cooler housing.
-
Unplug the connectors and vacuum lines on the front of the EGR cooler housing.
-
Remove all 7 bolts attachment bolts on top of the cooler. 3 bolts on each side, one in the middle.
-
Pull up on the EGR cooler housing. It rides on dowels and sometimes is hard to break loose of the valve cover/intake manifold runners.
Dissassembly of the EGR Assembly to remove EGR Core on a 6.7L Power Stroke

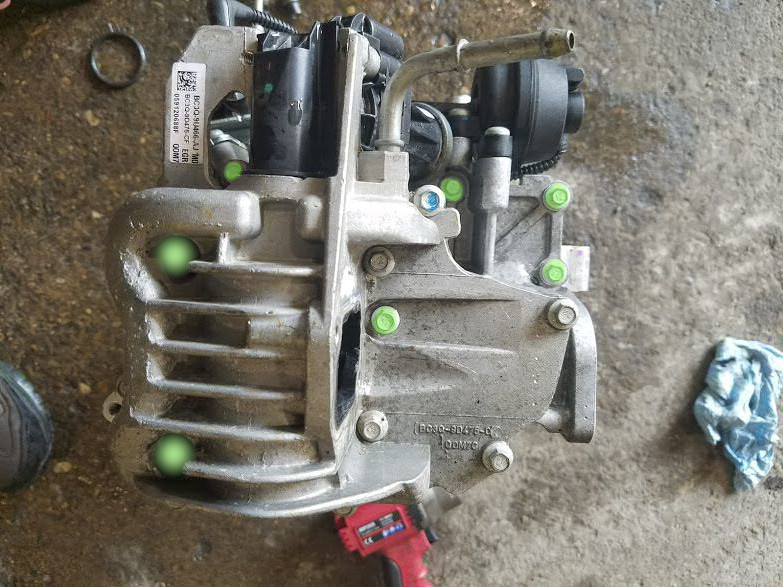
Disassembly of the cooler is rather straight forward. Start by removing the bolts that attach the front housing to the base of the cooler. The front housing bolts are not the ones on top, except for one bolt, but rather the ones the level below. I'v attached a picture of the front of the EGR cooler with highlights.
The highlights showing which bolts to remove but there are more that you can't see in this angle. Once these bolts are removed, using just a little force, like a light rubber mallet, you can separate the housing from the base.
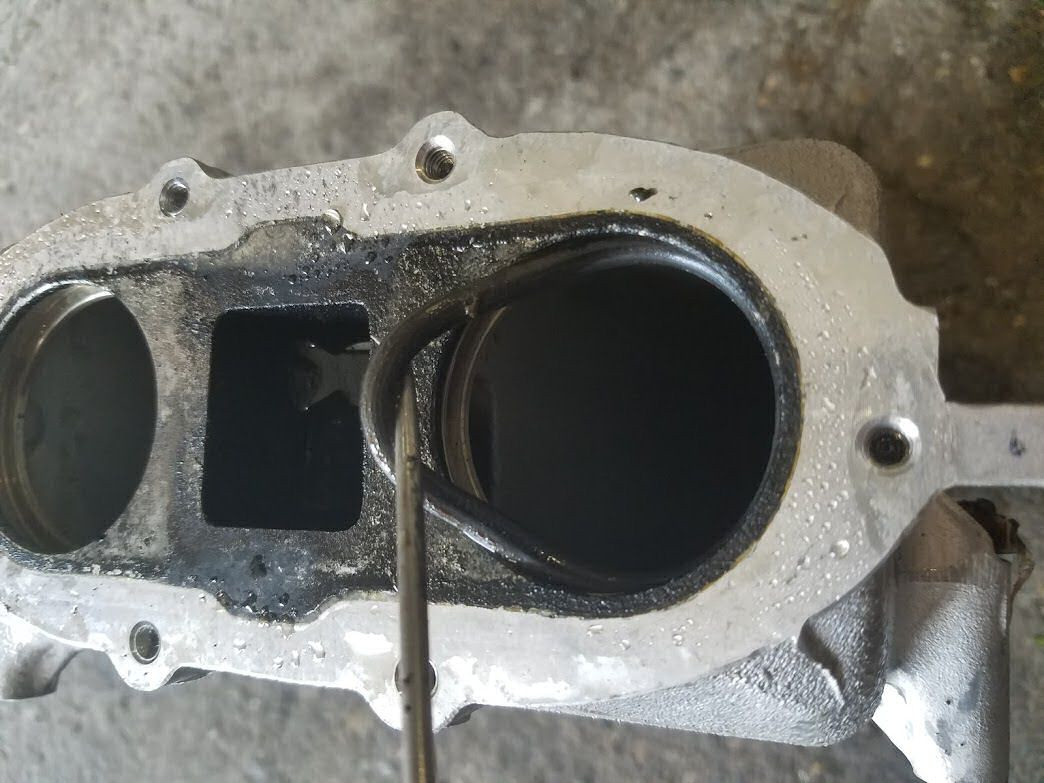
Next remove the rear crossover cover by removing the bolts. Remember the location of the studs. This cover should be easily removable. The final step of disassembly is forcing the EGR cooler core out of the base. You can accomplish this by finding two large diameter rods that fit down into the core from the side that had the cover on it. This rod will push on the fins inside of the core to remove it. The rods can be metal (exhaust pipe works), brass, or wood (old hammer handles). Stand on the base and alternate between hitting each rod until the core becomes loose enough to remove it completely.

Do not forget to remove and replace the EGR Cooler oring seals on the back side.
Be sure to clean the base housing, the crossover cover, and front housing. Carbon builds up in all three of these locations. Usually a small brush and a water hose work pretty well. The parts do not have to be spotlessly clean.
Reassembly of the EGR Cooler Core on a 6.7L Power Stroke
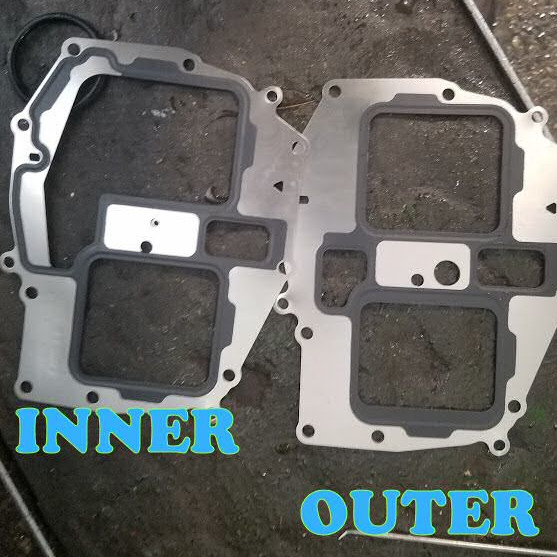
The two seperating gaskets are different. The inside gasket seals the cooler to the aluminum housing, the outside gasket seals the cooler to the EGR valve housing. A picture is provided for reference above.
Once everything is all cleaned up and ready to go, generously lube the orings you installed, then place the inner metal gasket on to the base housing before inserting the EGR cooler core. Push the core down into the base. Once you hit those seals you might bear your weight on it to get it to slide smoothly into place. Alternatively, you can find something flat and soft (like a wooden block) to finish pushing it into the base.
Do not hammer it into place, it will likely bend the cooler. Remember to line up the roll pins with the holes. Once the core is in place, remember to place the outer gasket on top before reattaching the EGR valve housing assembly. There are also seals to install on the valve cover. Now reinstall your EGR cooler assembly.

Follow the refill procedures listed on my other article Engine Coolant Refill Procedure for both the primary and secondary cooling system, however the 6.7L Powerstroke does a pretty good job of bleeding the air from it's cooling system naturally.
Clear the codes, test drive to make sure P0401 does not return. You are set to go.